
Flow Designer
User Manual: Flow Designer This manual describes all the features available in the Flow Designer graphical interface found in the Teach → Q&As section. The...
User Manual: Flow Designer
This manual describes all the features available in the Flow Designer graphical interface found in the Teach → Q&As section. The document is intended for the end user and does not contain code snippets: it explains what can be done using the GUI.
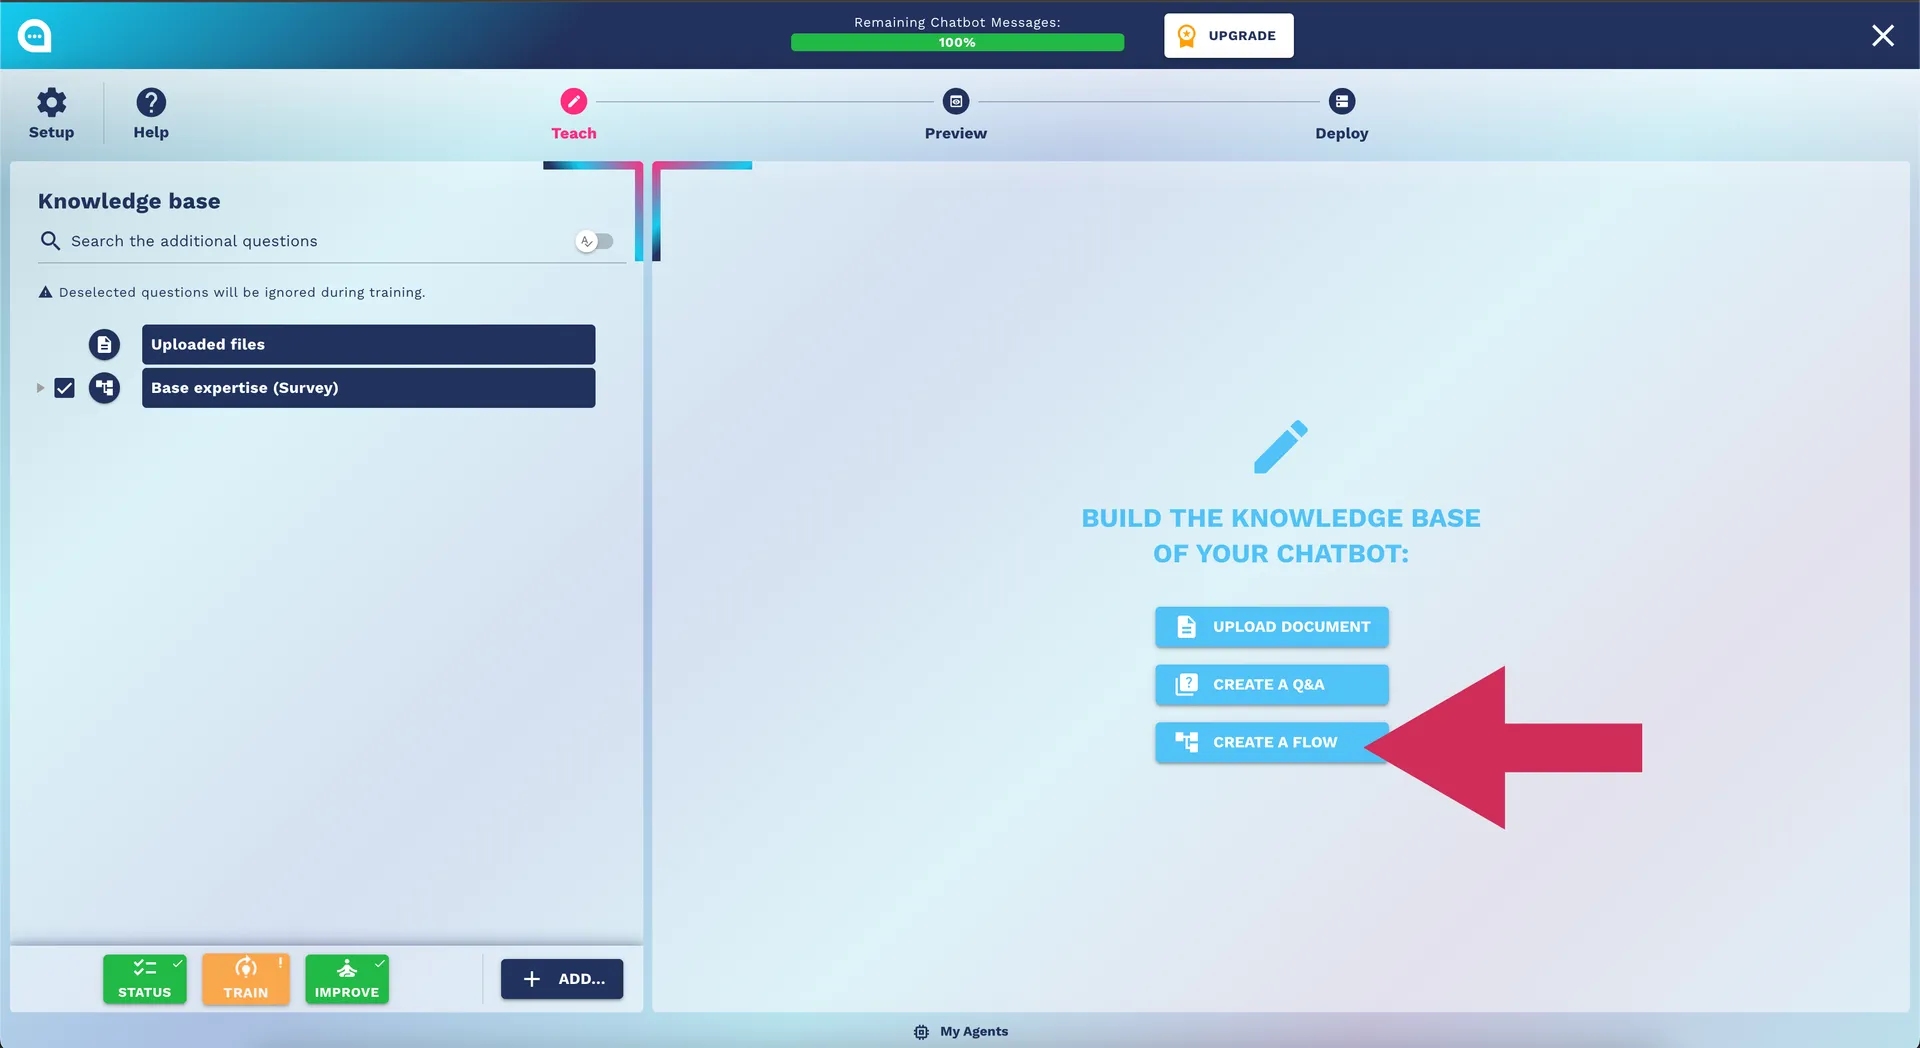
Overview
The Flow Designer is a visual editor for building conversational flows and automated bot actions. The main elements of the interface are:
- Drawing area (canvas): where nodes and connections are placed.
- Top toolbar: global controls (zoom, undo/redo, save, close).
- Dialog for editing messages and codes: modal windows for modifying the content of nodes.
- Nodes: logical units that represent bot actions, conditions, API calls, sending emails, executing code, etc.
- Controls on individual nodes: selection of type, specific settings, add/remove children, duplication, error icons.
Getting Started
- Open the Flow Designer via the corresponding button in the editing UI of a Q&A. The graphical representation of the existing flow will be loaded.
- The drawing area supports panning (drag the background) and zooming (toolbar or shortcuts). When dragging inside the area, the cursor changes between "grab" and "grabbing".
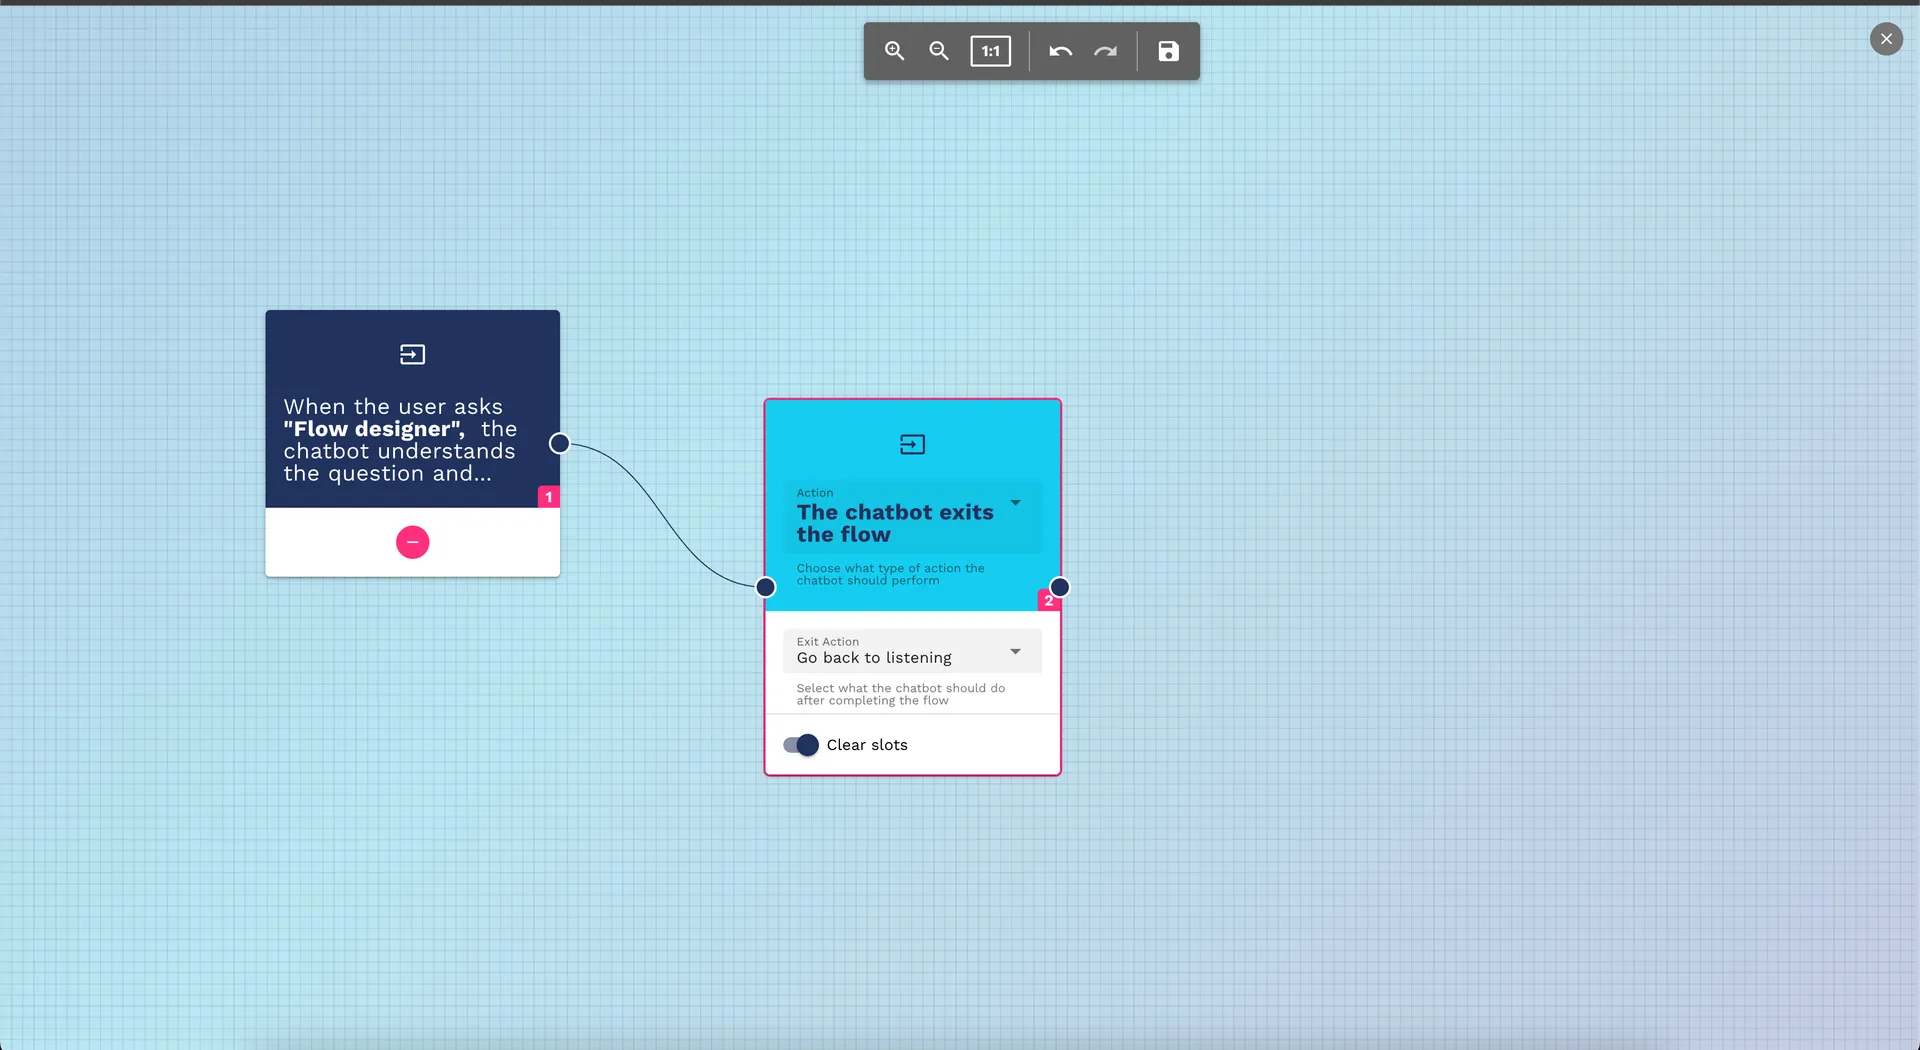
Top Toolbar
The top toolbar offers the following controls (from left to right):
- Zoom In (magnifying glass with +): zooms in on the canvas to view node details.
- Zoom Out (magnifying glass with -): zooms out for an overview.
- Reset Zoom (1:1): resets the view to a 1:1 scale.
- Undo: undoes the last action taken in the editor. Disabled if there are no actions to undo.
- Redo: restores the last undone change. Disabled if there are no actions to redo.
- Save (disk icon): saves the current flow. Also saves the validity state of the flow.
- Close (X icon): closes the Flow Designer. When possible, saving will be executed before closing.
Tips:
- Each button shows a descriptive tooltip when hovered over.
- Undo/Redo follows the history of changes of the individual editor.
Flow Validation
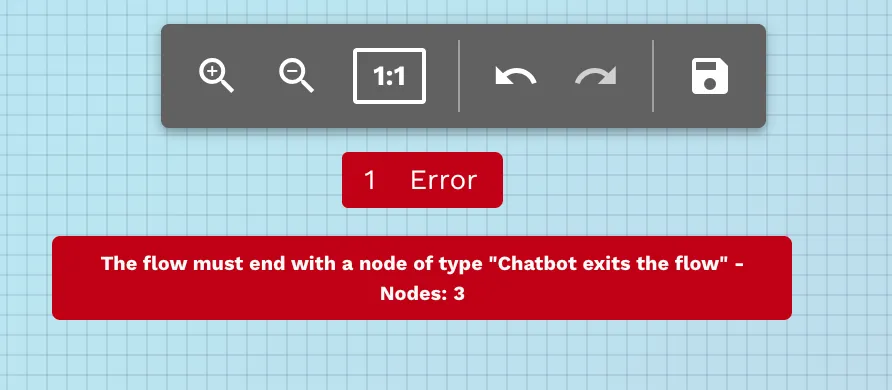
- At the bottom right of the toolbar, an error indicator (chip) appears if the flow contains validation issues.
- The chip shows the number of errors and, when hovered over, provides detailed error messages.
- Some nodes display error icons directly on the node header; clicking the icon allows reading messages related to that node.
Nodes: Types and General Controls
Each node is contained in a card with three main areas:
- Header: shows icons, type/action, bot class selector, any links to documentation, and the node ID.
- Data: contains editable fields specific to the node (e.g., message text, email input, selectors, etc.).
- Actions: quick buttons (e.g., set configurations, add/remove child, duplicate, save).
Common behaviors for nodes:
- Type/action selection: many nodes allow choosing the type of action (e.g., BotReplies, BotRunsCode, MailLead, SmtpMail, etc.) via a selector in the header.
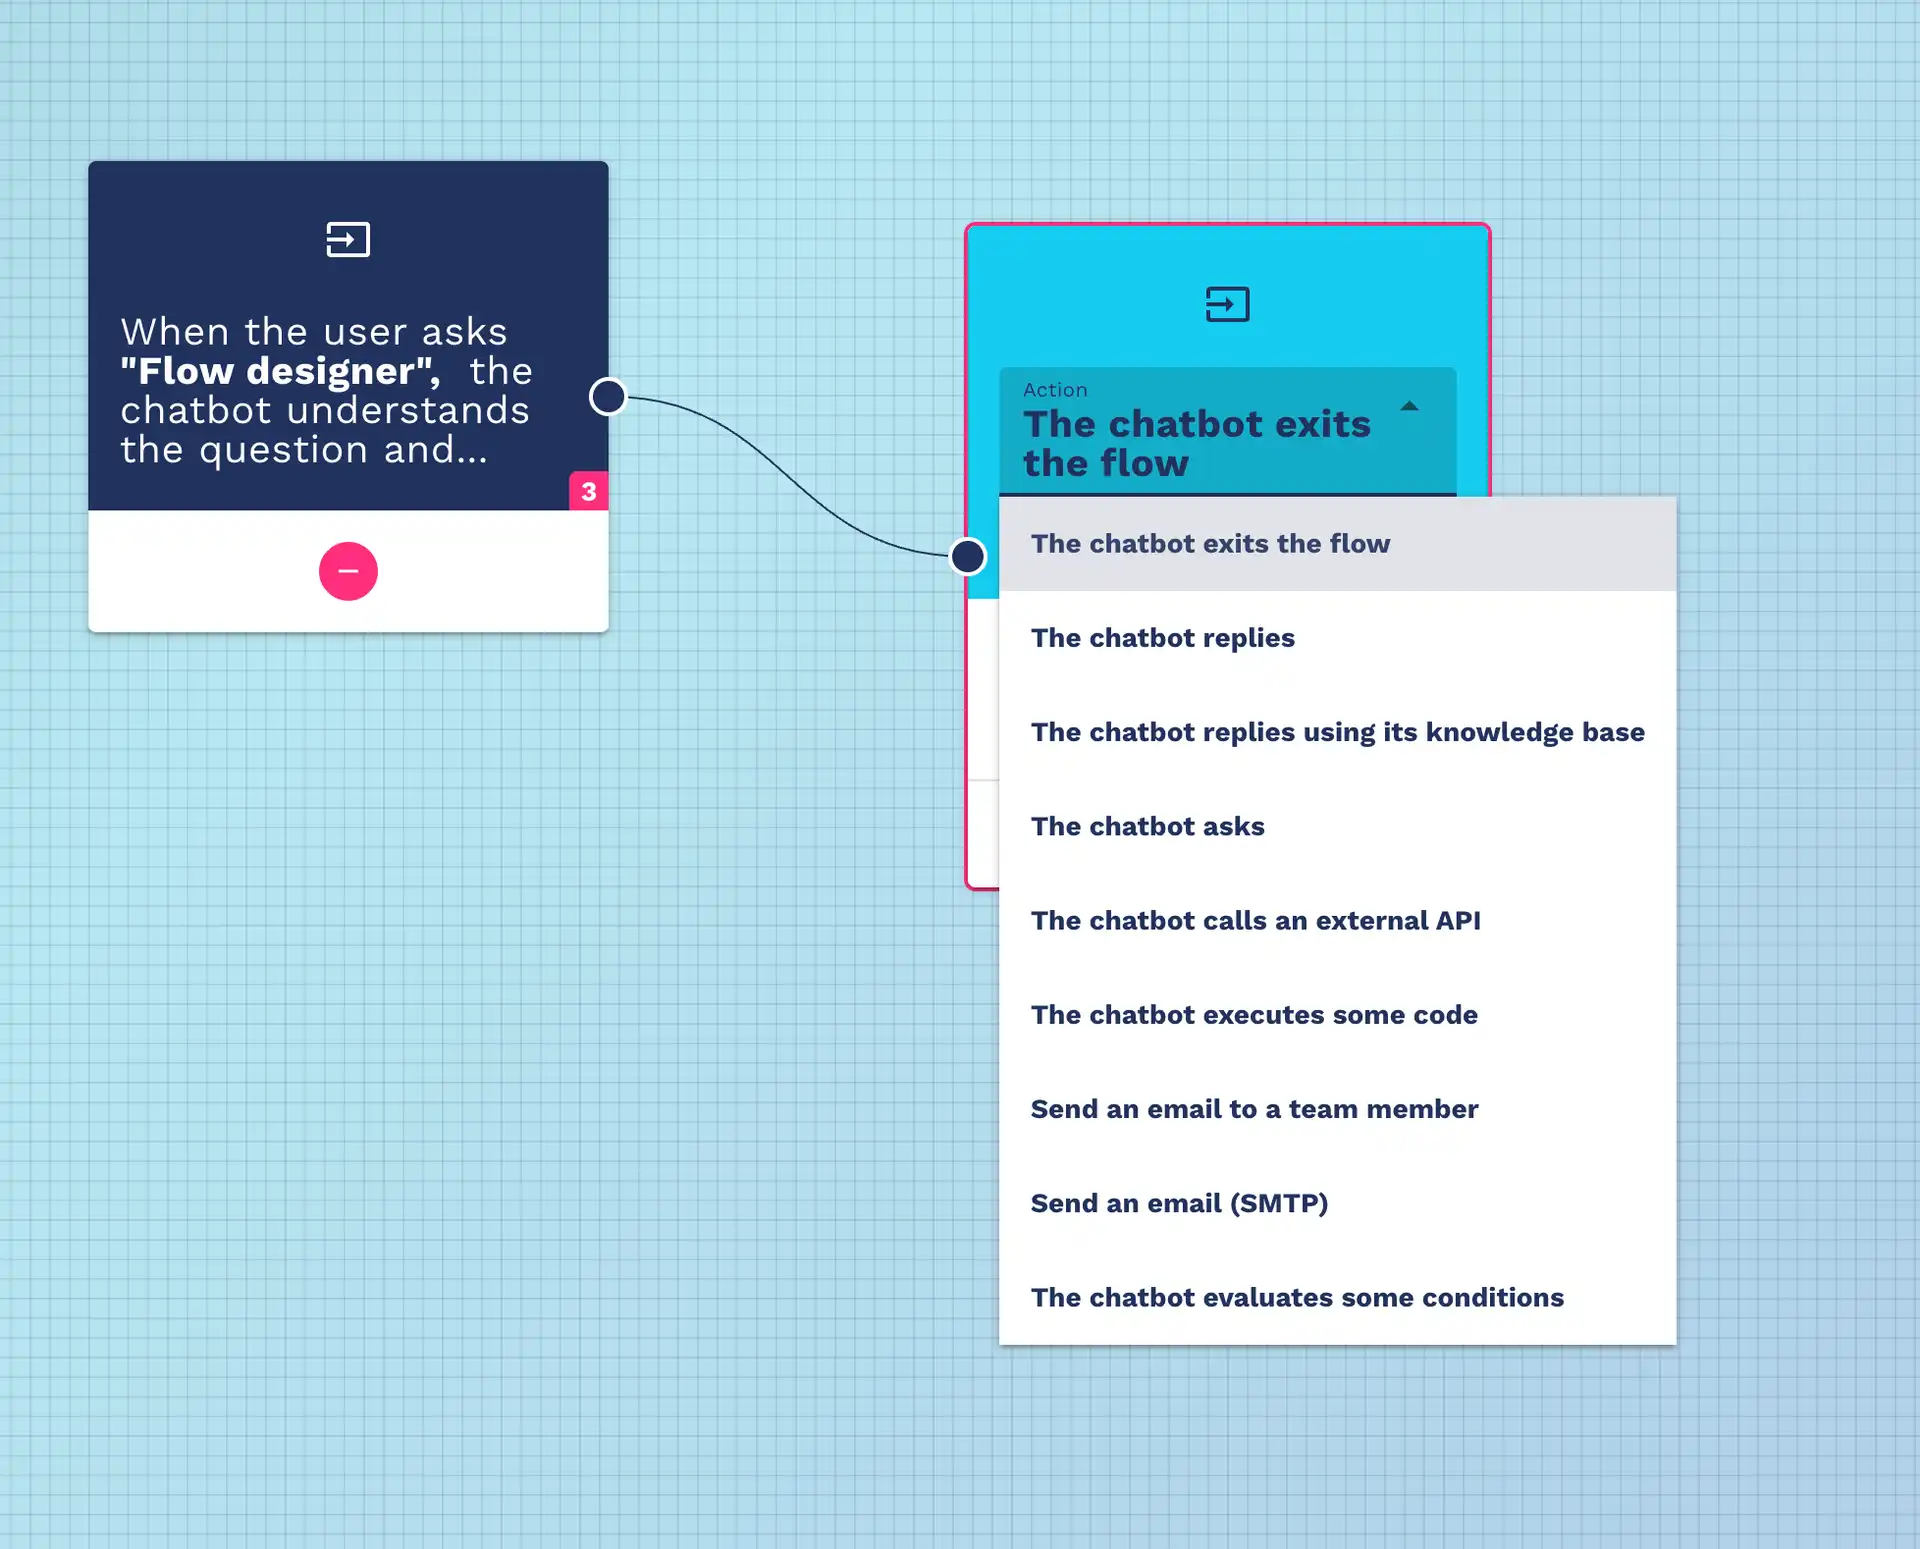
- Bot class: it is possible to switch a node between "Bot" and "User" classes (when applicable) using the node class selector.
- Documentation: some nodes show a help button that opens the relevant documentation page.
- Node ID: displayed at the bottom right of the header (useful for debugging/tracking).
Actions on Nodes
For each node, quick actions are available:
- Add Child (Add): adds a connected child node. The button is visible only if there is no existing child in the corresponding slot.
- Remove Child (Remove): removes the connection with the selected child.
- Duplication: some nodes (like those representing messages or code execution) offer a button to duplicate the node.
- Settings/Config: many types of nodes have a settings button that opens a dialog with additional fields (e.g., SMTP settings, code configuration, API parameters).
- Save: in dialogs/modals for complex edits (e.g., message editor, HTML editor, code settings), there is a save button that applies changes to the node and often closes the window.
Connections Between Nodes
- Nodes connect via edges/connections: the editor allows creating and removing connections between nodes (usually with drag & drop on the node connectors).
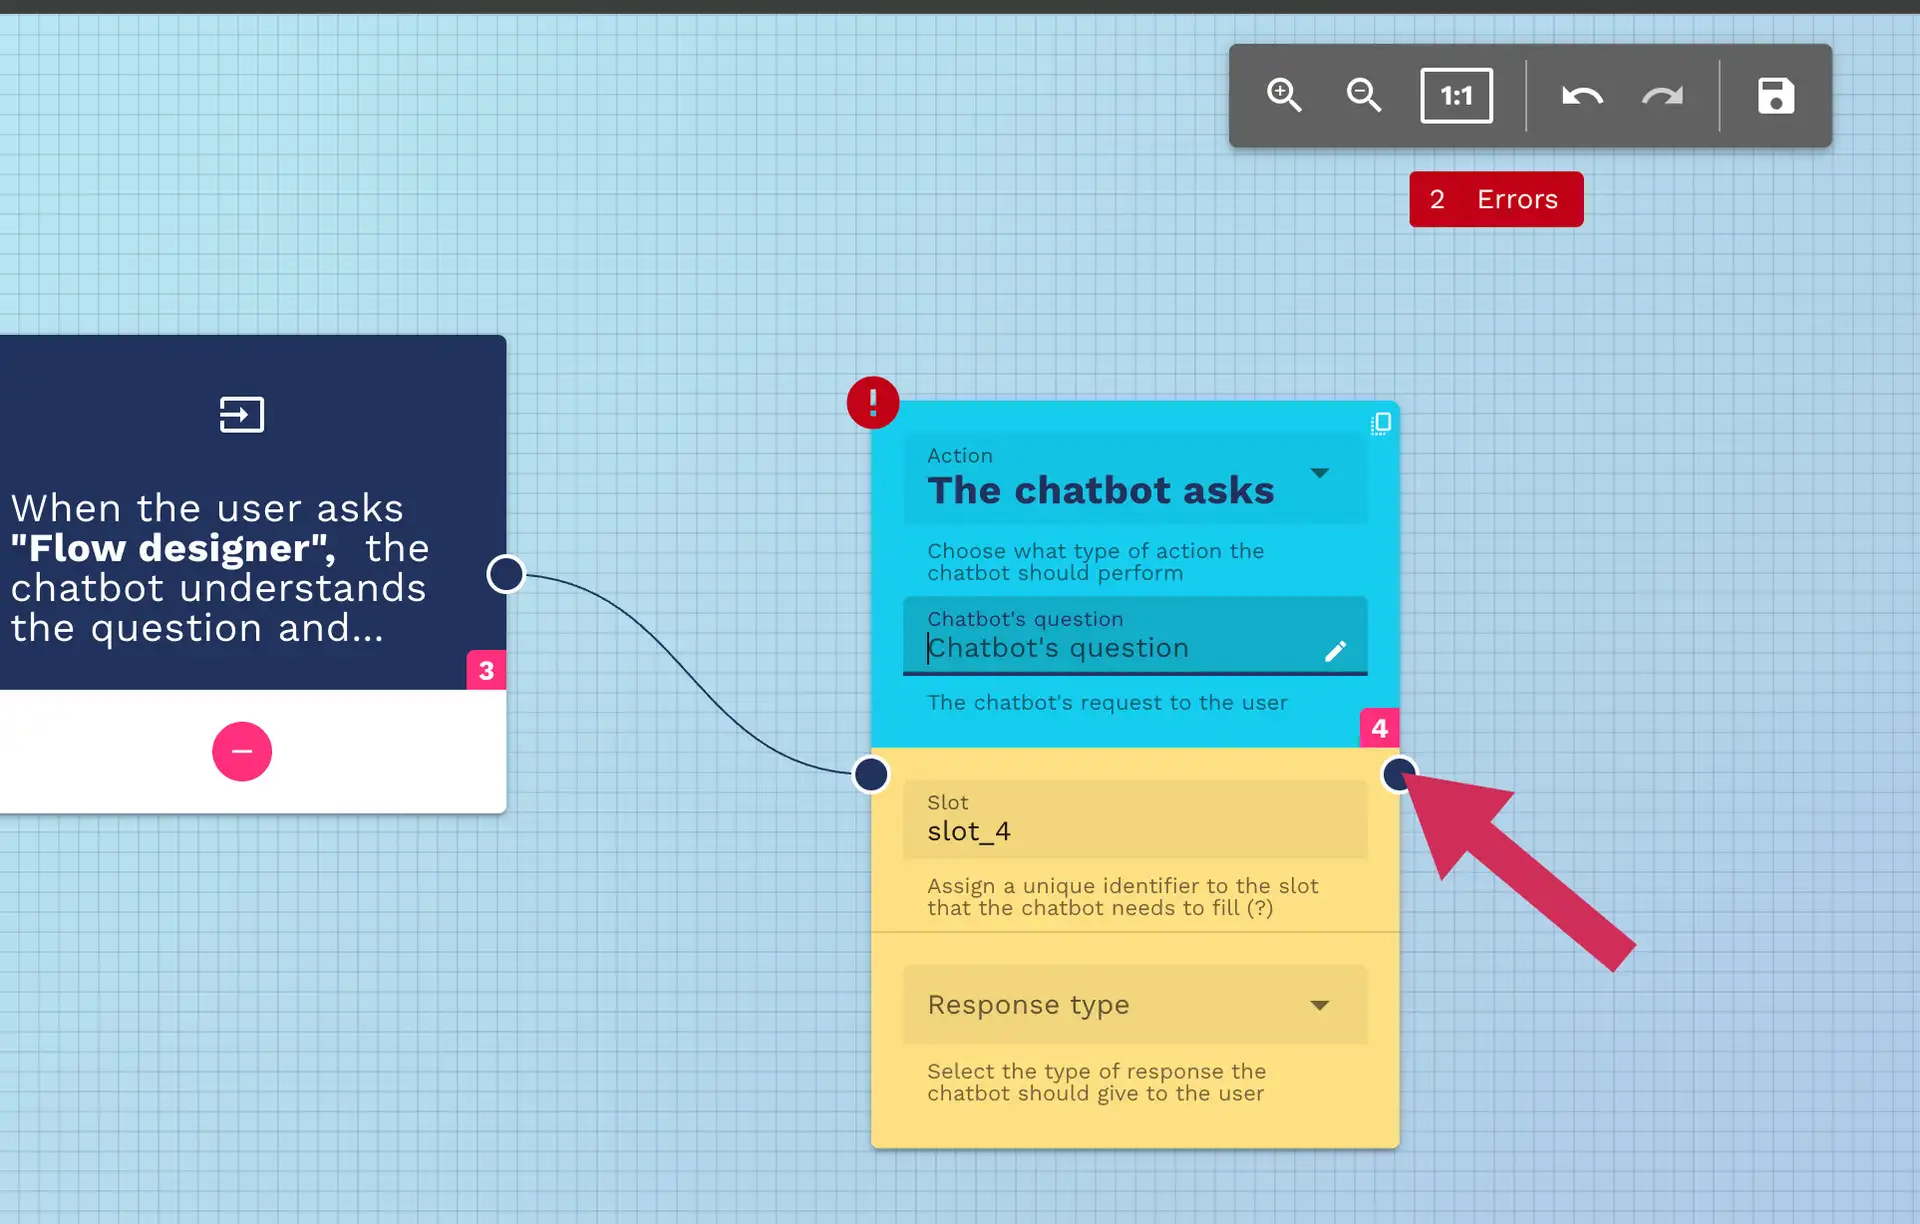
- It is possible to have branches (forks) with conditional nodes that direct the flow along alternative paths.
Specific Nodes and Their Use in the GUI
Below is an overview of the most relevant types of nodes and the options that the user can modify through the interface.
-
Purpose: to send a textual response from the bot or a response that uses a knowledge base.
-
What can be done in GUI: open the message editor (modal) to write the text/markdown of the response, use formatting toolbar, save or cancel changes, set the node class.
-
Purpose: node where the bot asks a question to the user.
-
What can be done: modify the question text via the message editor, set links to subsequent nodes.
-
Purpose: execute custom logic/Script and return output via slots.
-
What can be done: open the code configuration panel (editor with highlighting), choose the language, enter a description, add or remove output slots (variable names), save or close the panel.
-
Purpose: route the flow along different paths based on conditions.
-
What can be done: the node shows the condition description; through the UI, it is possible to see if it is an IF or ELSE branch, remove or add bot child nodes; the condition is displayed with a label.
-
Purpose: call external endpoints or services (e.g., sending emails via SMTP, sending leads via API).
-
What can be done: for email nodes, there is a form to set sender, recipient, subject, message body, and attachments; open SMTP settings for host/port/user/password/secure via dialog; save the settings.
-
For MailLead: select recipients from a list of team members (select), set reply-to, subject, message, and file attachments.
API Interface (Postman-style) for BotCallsAPI Nodes
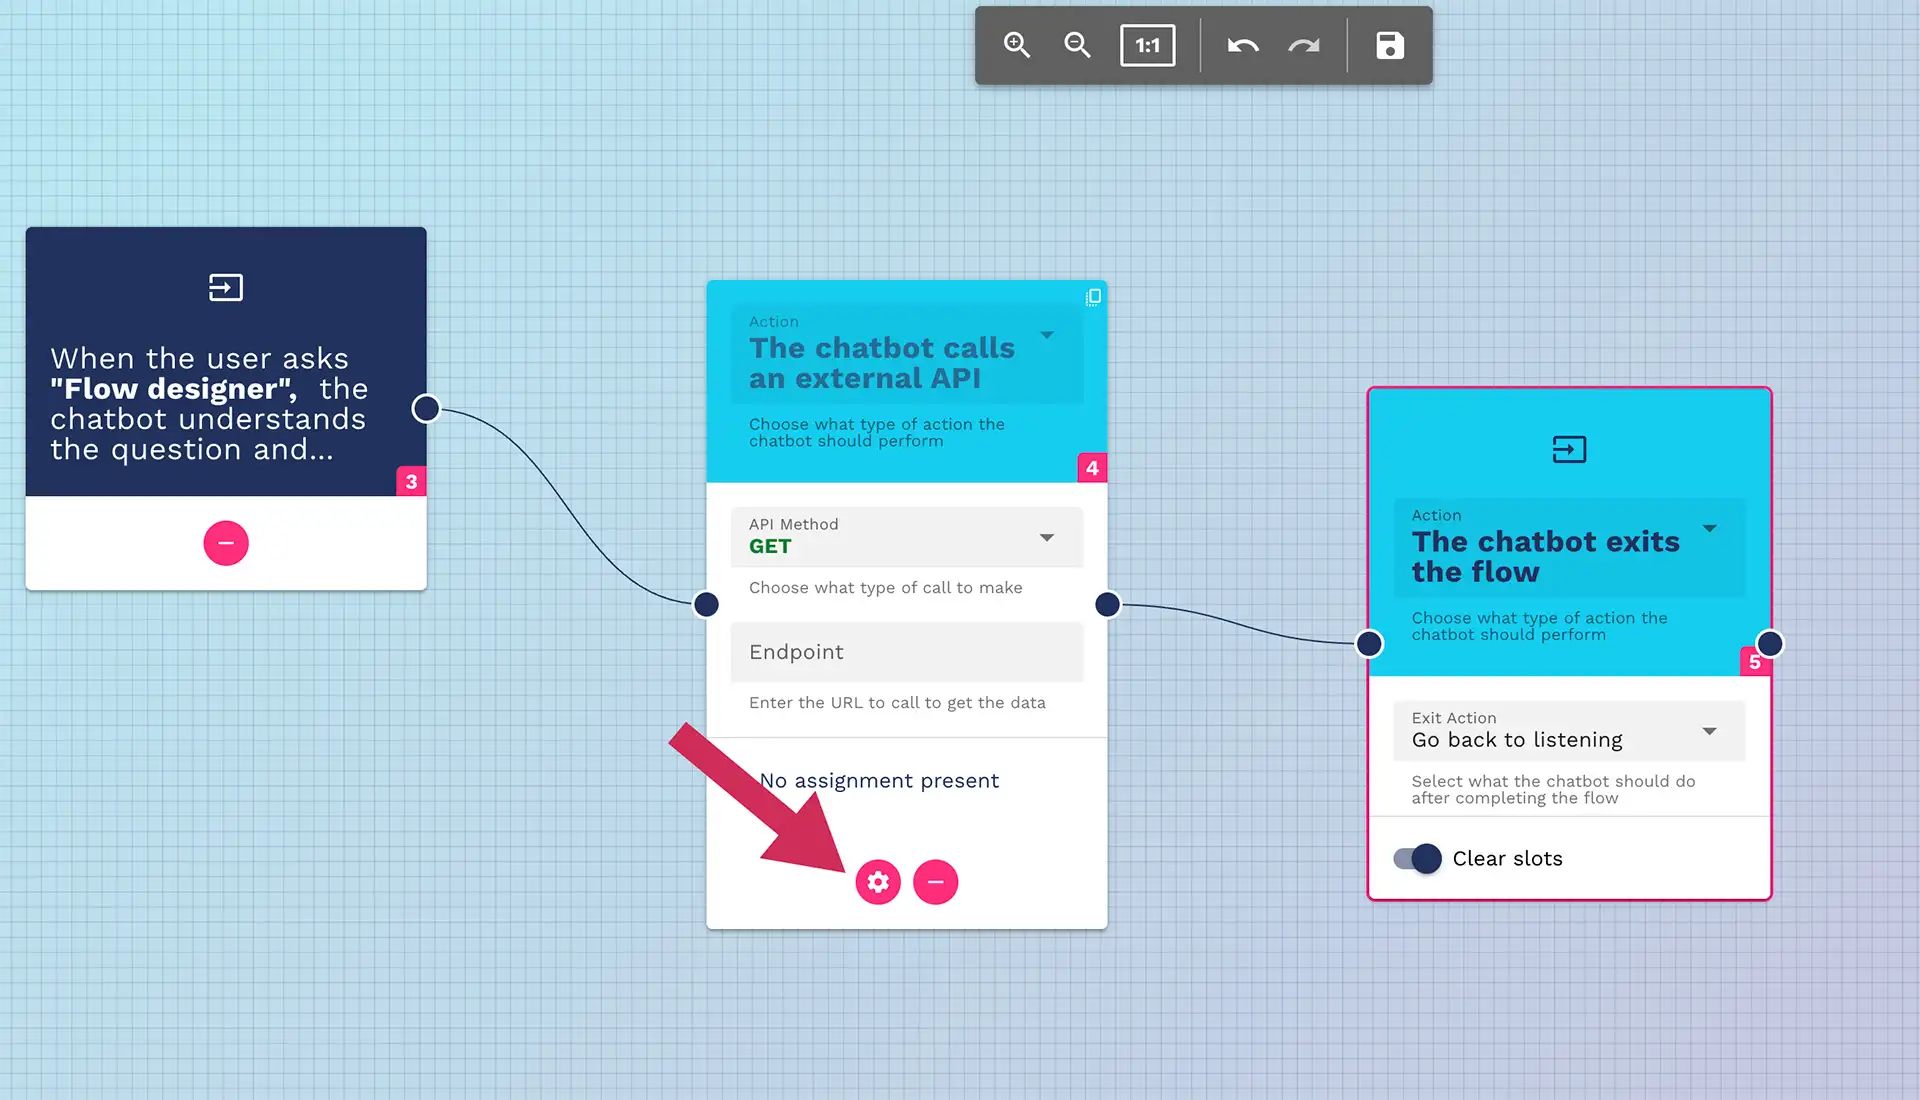
Some nodes that invoke external services (typically the BotCallsAPI group, including variants like MailLead or custom nodes that call endpoints) expose a Postman-like interface in the GUI. This interface allows configuring all the necessary elements to make the HTTP call without writing code.
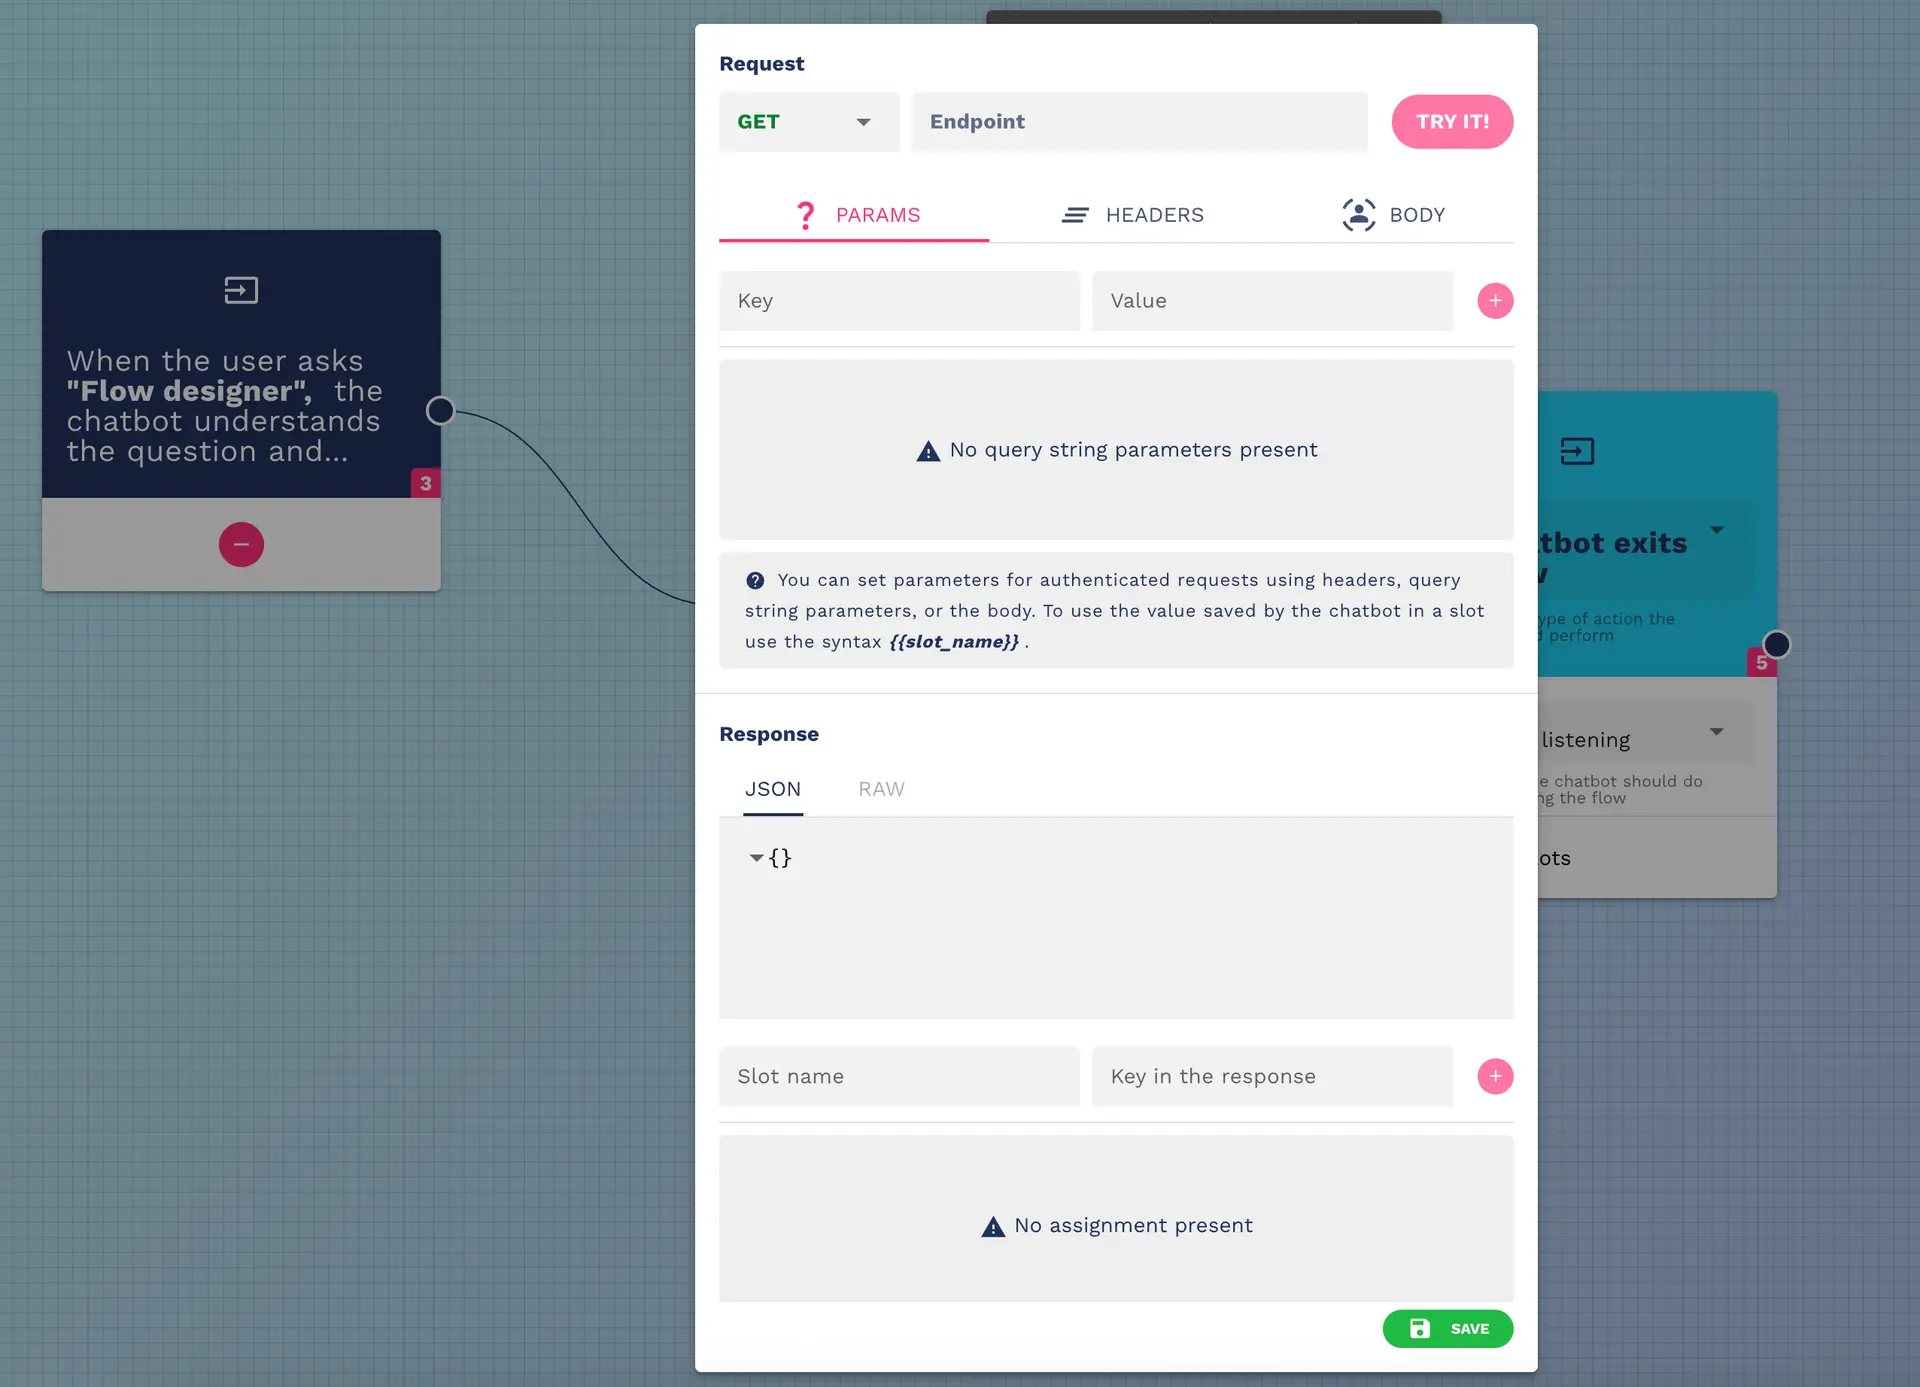
Below are the fields and controls that the user finds and how to use them:
-
Endpoint (URL)
- Text field to enter the URL of the service to be called.
- It can be an absolute URL or a URL constructed from environment variables/bot placeholders (if supported by the instance).
-
HTTP Method
- Selector to choose the request verb (e.g., POST, GET). Usually preset to POST for data submissions.
-
Content Type
- Field indicating the content type of the request (e.g., multipart/form-data, application/json). The chosen type influences which form controls are active.
-
Headers
- Section to insert custom HTTP headers (e.g., Authorization, custom Content-Type, custom headers).
- In the GUI, static headers or those with placeholders can be set; critical headers like Authorization can be pre-filled from the bot configuration (e.g., token) and shown as read-only or editable depending on permissions.
-
Form Data / Body
- Section equivalent to the "Body" tab in Postman. Allows defining key/value pairs called
formDatawhen the content type is multipart/form-data, or a free body field when using JSON or other content types. - For each form entry, it is possible to choose the type:
- text (text field)
- file (for attachments)
- json (structured text)
- The interface allows adding, modifying, or removing formData fields conveniently (dedicated inputs, type selectors, and buttons to remove).
- Section equivalent to the "Body" tab in Postman. Allows defining key/value pairs called
-
Authentication Parameters
- If the service requires credentials (e.g., SMTP or Authorization header), the GUI includes fields to enter them (username/password, toggle secure, etc.). These fields may appear in the specific section of the node (e.g., SMTP settings) or within the headers/form section.
-
Field Validation
- Many fields are subject to validation rules: mandatory fields must be filled out before saving; if required values are missing, the node shows error icons, and global saving may be disabled.
- Validations are indicated with text messages and icons next to the fields.
-
Saving Configuration
- After setting endpoint, method, headers, and form data, use the Save button present in the partial
SaveFlowor in specific dialogs to make the configuration persistent on the node. - Saving updates the flow state and synchronizes the Q&A with the bot configuration.
- After setting endpoint, method, headers, and form data, use the Save button present in the partial
-
Testing and Preview (what to expect)
- The interface offers a button to test the API call before saving the flow.
-
Practical usage examples (described without code)
- Sending a lead: set the method to POST, enter the endpoint of the CRM service, add the corresponding formData fields for the required fields (name, email, phone), add any Authorization headers, and save.
- Sending an email via connector: fill in the "from," "to," "subject," "html" (or "message") fields, set attachments in formData as file type, open SMTP settings to enter host/port/user/pass and save.
-
BotStops
- Purpose: terminate the flow or switch to a handover action/return to the main menu/call QA.
- What can be done: choose the type of exit (listen, main_menu, handover, call QA), select which Q&A to call in case of 'call QA', enable/disable clear slots (toggle) and save.
Message Editor
- Opening: clicking the edit button on the node opens a balloon/modal with the WYSIWYG markdown editor.
- Editor features:
- Toolbar: undo/redo, emoji, headers, bold, italic, strikethrough, quote, lists, horizontal line, link, image (depending on the node type, some options are disabled), code block.
- Preview mode: ability to see the rendering of the markdown.
- Saving: the save button applies changes to the node; if there are errors, saving may be disabled.
- Cancel: button to discard changes and restore the previous text.
- Sticky footer: shows specific errors for the node if present.
Code Editor
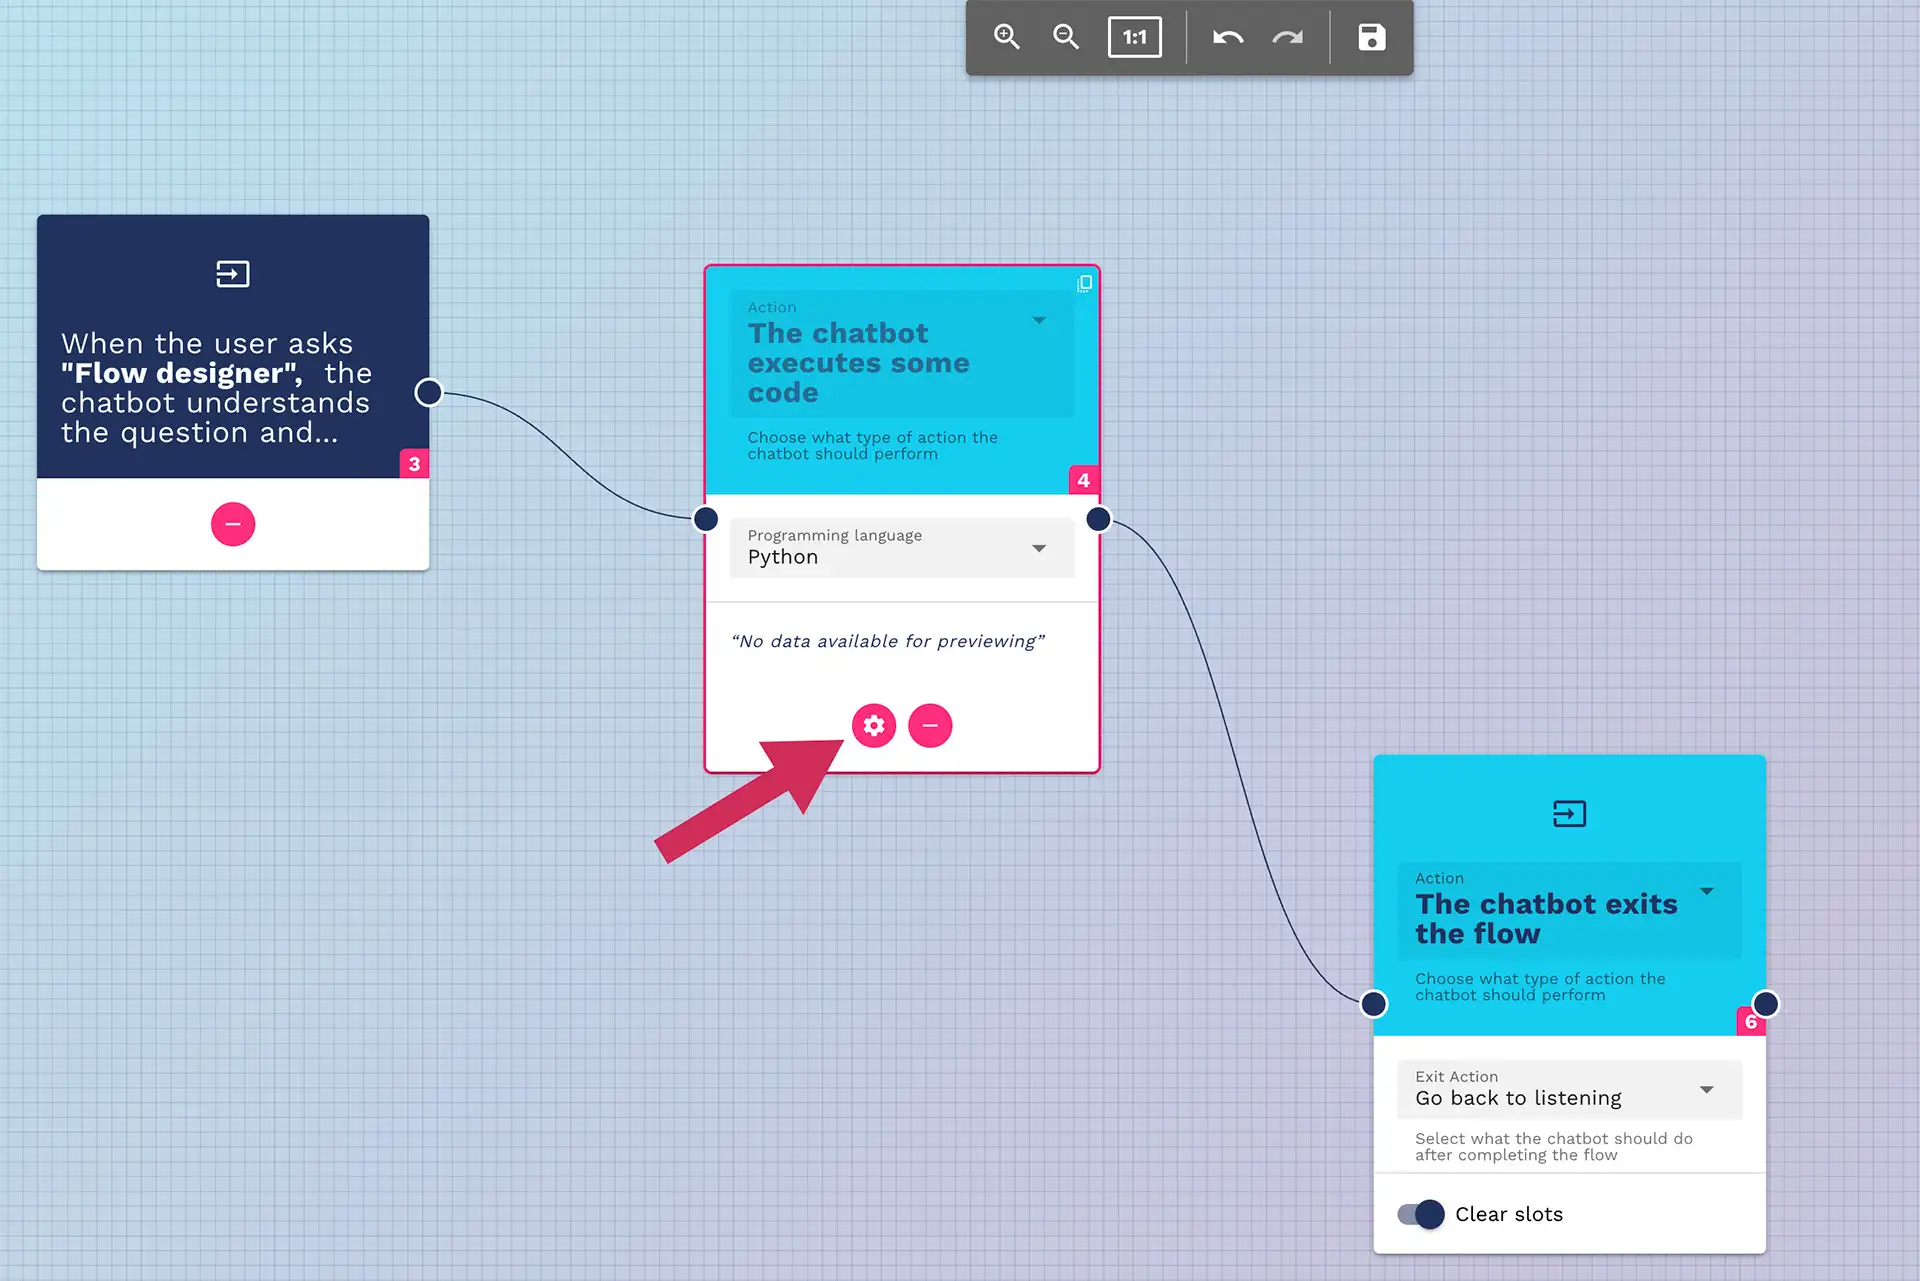
- Access: for code execution type nodes (BotRunsCode), a dialog opens with an integrated code editor (CodeMirror).
- UI features:
- Choice of programming language (e.g., JavaScript, Python) via a selector.
- Code input area with syntax highlighting.
- Description: field to enter a brief description of the script's behavior.
- Add/remove output slots: fields to define the names of output variables produced by the code. New ones can be added and removed via removable chips.
- A help/tooltip shows code examples and explanations related to the selected language.
- Button to close without saving.
HTML Editor
- Used for nodes that allow HTML content as the body of emails or advanced formatted messages.
- Allows editing with highlighting and preview; the content has a dedicated save and can be validated before saving.
SMTP Settings (for SmtpMail nodes)
- Access: the Settings button in the node opens a dialog showing fields for host, port, secure (toggle), username, and password.
- Validation: fields are validated; until they are filled out correctly, saving is disabled and an error icon is shown.
- Saving: the Save button applies the settings to the node.
Adding / Removing Nodes and Branches
- Add a node: use the "add" button available in the action slot of the node or drag a new node if supported by the editor (depends on the canvas interface).
- Remove a link: select the node to delete and use the keyboard command "command+delete" (MAC) or control+delete (on Windows).
- Duplicate: if the node supports duplication, clicking the copy icon creates a new identical node connected or placed nearby.
Saving and Closing Behaviors
- Explicit saving: the save button saves the flow, synchronizes the Q&A with the bot configuration, and updates the validity state.
- Saving from dialogs/modals: many editing windows (e.g., message editor, HTML, code) include a save button that applies changes to the node and, in some cases, invokes the global save function.
- Closing: pressing Close will execute saving if possible, then the Flow Designer window will close.
Usage Tips
- Before closing the designer, use the Save button to ensure all changes are persisted.
- Always check the error indicator: the chip with the number of errors helps not to overlook validation issues.
- When working with the code editor, clearly define the output slots to connect results to other nodes.
- For sending emails, correctly configure the SMTP settings and verify sender/recipient before saving.
Common Error Messages (what they mean)
- Flow validation errors: indicate missing connections or required fields not filled in one or more nodes.
- Node errors: warning icon on the node means that node has invalid fields or missing configurations; open the node and read the popup messages.
References and Documentation
- Some nodes include direct links to external documentation (help icon). Use them to delve deeper into specific behaviors (e.g., integrations and mail).